
QBD 1099 CSV Exporting
How to format the QB 1099 Detail Report
QB Desktop 1099 CSV Export
Due to changes related to the 1099-NEC, we no longer support direct QB import via web connector.
Step 1: Export your 1099-MISC or 1099-NEC info from QB to a CSV file.
Step 2: Edit your QB CSV file to format Vendors suitably to cut and paste into our CSV template.
Step 3: Cut and paste into our CSV template and import.
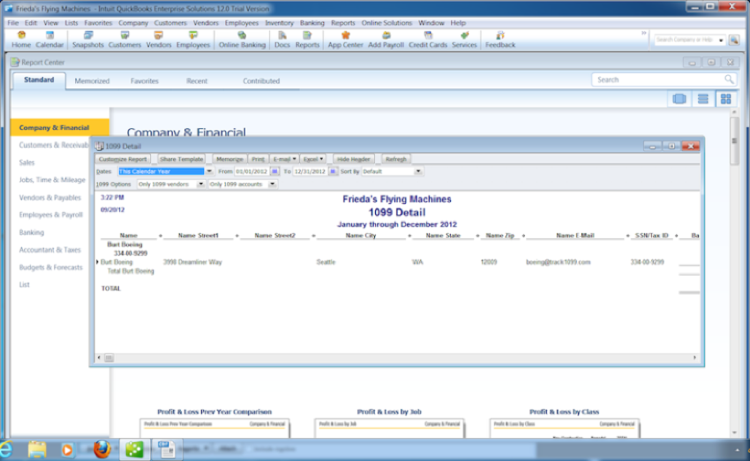
From the upper menu, select Vendors->Print/E-file 1099s->1099 Detail Report
Update "Dates" to Last Calendar year for tax year 2024.
Change "Only 1099 Vendors" to "All Vendors" and "Only 1099 Accounts" to "All Allowed Accounts".
After generating the report, you may manually delete rows for any vendors with non-reportable payments.
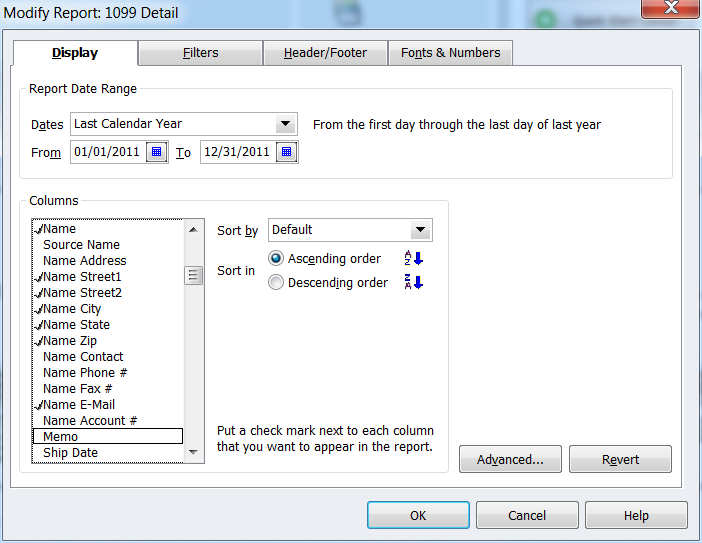
Select "Customize Report" in upper left corner of the report.
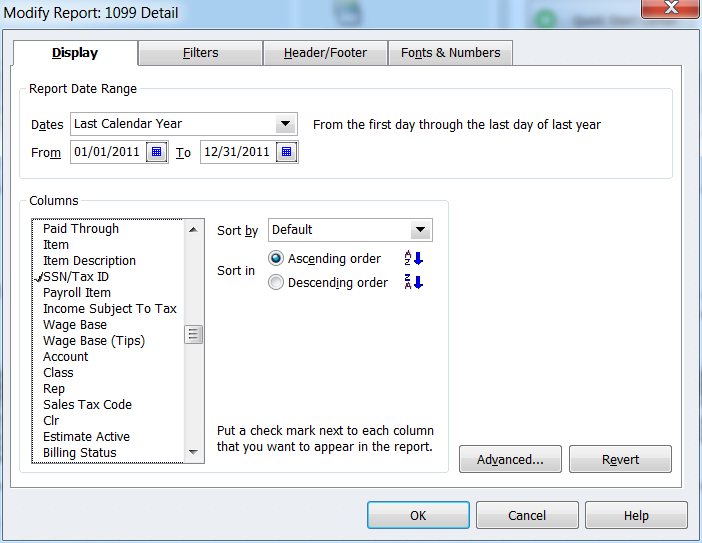
In the "Display" tab, look for the "Columns" window and de-select all defaulted checked items.
Now, check only: Name, Name Street1, Name Street2, Name City, Name State, Name zip, Name email, SSN/Tax ID, and Balance. Click OK.
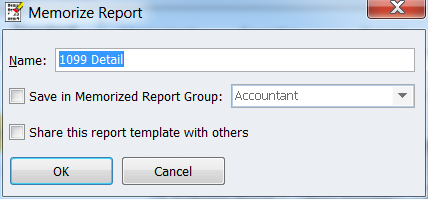
Click Memorize in the top part of the Report, then OK.
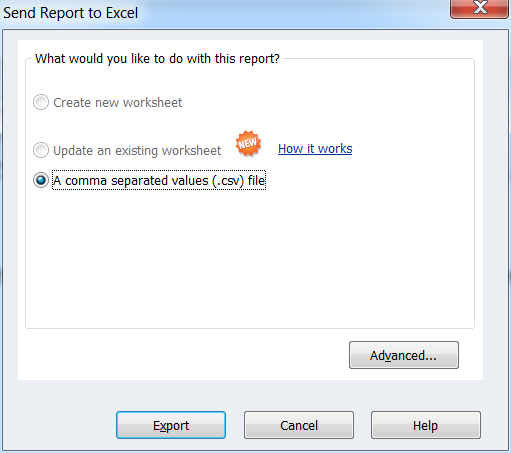
Select the Excel button in the report. Make sure the CSV file is selected. Click Export.
Step 1: Export to CSV
Open the CSV file. Your headings should be Name, Name Street1, Name Street2, Name City, Name State, Name zip, Name email, SSN/Tax ID, and Balance.
Select cell A1. Delete it, moving the other cells in column A up one row.
Select cell I1 and delete it, moving the other cells in Column I up.
The final row of each vendor detail should now include “Total(+ vendor name)” in column A as well as the total balance in column I.
Check that the address, email, and TIN are also showing on this row with total balance.
In Excel, select all cells. From the Data tab, select Sort and sort all by Column A.
The purpose of this step is to separate the total paid to each vendor from all individual payments throughout the year.
Scroll down and look for the rows starting with Total Name.
Cut and paste only these rows containing Total Name into a new Worksheet.
In the new worksheet, insert a column between column A and column B.
Highlight column A, in the “Data” tab in Excel select “Text to Columns” then choose “Fixed width”.
Insert one break directly before the first letter of the vendor name.
Select “Next” then “Finish”.
You should now see only the word “Total” in column A and only the company name in column B.
Delete column A.
To merge column B with column C to to include total address in one cell:
Insert a column after column C.
Use this formula in cell D2 to combine both cells B2 and C2 with a space in between: =CONCATENATE(B2," ",C2)
Drag formula down for all cells in column D.
Now select the entire “D” column and “Copy” and “Paste Special” then choose “Values” - this will remove the formula from these cells and leave only the address.
After merging the data in column B and column C, you can delete both of these columns.
Save. You should now have all of the required fields to copy and paste into the Track 1099 CSV template.
Step 2: Edit CSV to Properly Format Data
Login to Track1099, select Import Data from the top Nav menu, then CSV file.
Download our 1099-NEC or 1099-MISC CSV template, then copy and paste the appropriate columns of data (without headers) from your QB spreadsheet into our CSV template. Note that in tax year 2020, 1099-MISC box 7 now goes into the 1099-NEC box 1.
Do not change the headings in the CSV template or rearrange the columns.
If you have vendors located in the Northeast Coast of the U.S., you may see zip codes that begin with a “0”. In order to keep this leading zero in your CSV file, follow these instructions:
Select the entire column of zip codes, then right click and “Format Cells” select “Special” and then “Zip Code”.
Avoid reopening this file in Excel after saving as CSV or the zip codes with leading zeros will default back to only four digits.
For Column 2, “Federal ID type”, you may fill in each row manually or leave blank. Based on the number of dashes in the Tax ID number (column C), we’ll determine the appropriate Tax ID number type for you. One dash = EIN; two dashes = SSN.
Save our template with your data as a CSV file.
Now you can select and upload this file from our Import Data->CSV page.